
THE SCENARIO
Imagine this following situation... You're using your outdated Windows XP laptop; surfing the web, messing around with MS-DOS, playing Doom 2 and Classic Runescape. After struggling with the many crashes, freezes, hangs and force resets that come with this territory you finally decide that it's time for an upgrade. For the next few weeks you start saving all that extra money you'd typically spend on Venmo everyday at lunch with colleagues until you feel you have enough to toss out that expired "Atari" you call a laptop. After scouring Craigslist for the better part of a Saturday morning you finally decide upon a slightly used HP Probook 430 G2 from a local seller. You take off to meet the soon-to-be previous owner of the HP at your local McDonalds (because sketchy people only do deals in back alleys!). With your expertise of the tech world you briefly look over the device and see that it is a fresh installation of Windows 8.1! After not prompting for a password at the login screen you feast your eyes upon the beautiful new layout of the Desktop, and as if things couldn't get any better you notice it has touch screen capabilities! SOLD! You hand over the money and race home to search Google for all of the updates to your currently outdated software. Once home, you pop open your new fancy laptop, only to realize that in your haste to finally rid yourself of your Y2K-era hardware you forgot to check for the existence of a BIOS level password! Craigslist guy has gone ghost on you, a week of failed Google queries about "HP Probook 430 G2 BIOS Password Reset" has finally landed you here at Ghostlyhaks whereupon you find an article by a "therealjayvi" who claims to have the answer to your problems. Reluctant to have your heart broken by yet another "expert" on the subject, you finally decide that his other articles seem legit, and click "Read More" to surprisingly find...
THE "ANSWER TO YOUR PROBLEMS"
For the sake of the scenario, this tutorial will follow the steps needed to reset the BIOS Admin password on a HP Probook 430 G2, although this same method applies to ALL HP Probooks & Elitebooks. The only difference being you will need to find a clean bios.bin for YOUR OWN EXACT MODEL to be used. BIOS binary absolutely CANNOT be used for ANY other model besides the intended device. You may use this guide as an outline for what you will need to do, but if you don't have specifically a HP Probook 430 G2 then you will have to provide your own BIOS dump. If you are unable to find one or would just rather not deal with the hassle then send me a PM or Email and for $10 I will find you what you need.
UNIVERSAL PREREQUISITES
- Raspberry Pi (or other similar ISP) with Flashrom installed
- Properly connected SOIC8 clip to your Pi
DOWNLOADS (OS X)
DOWNLOADS (WINDOWS)
STEP-BY-STEP
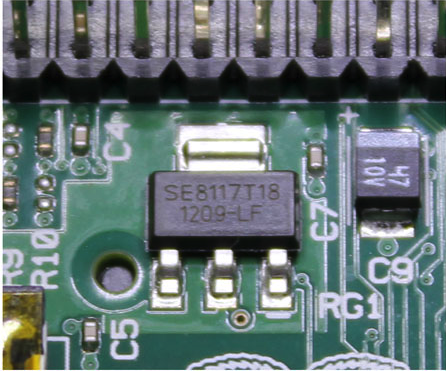
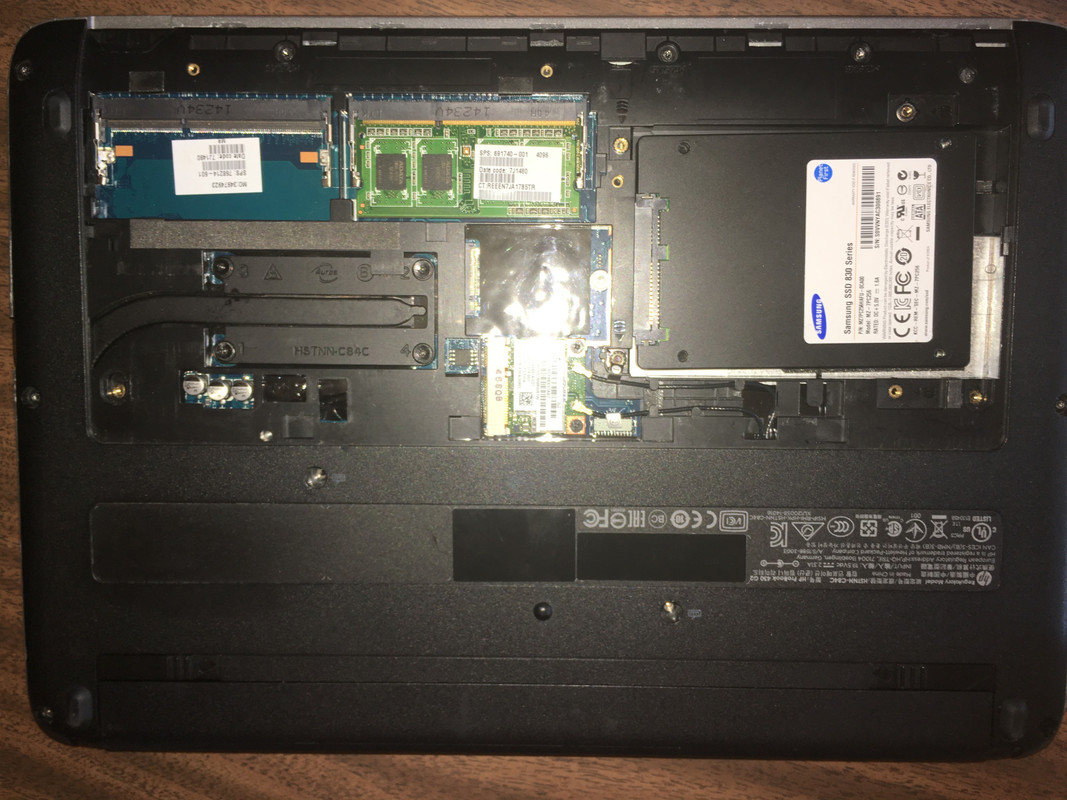
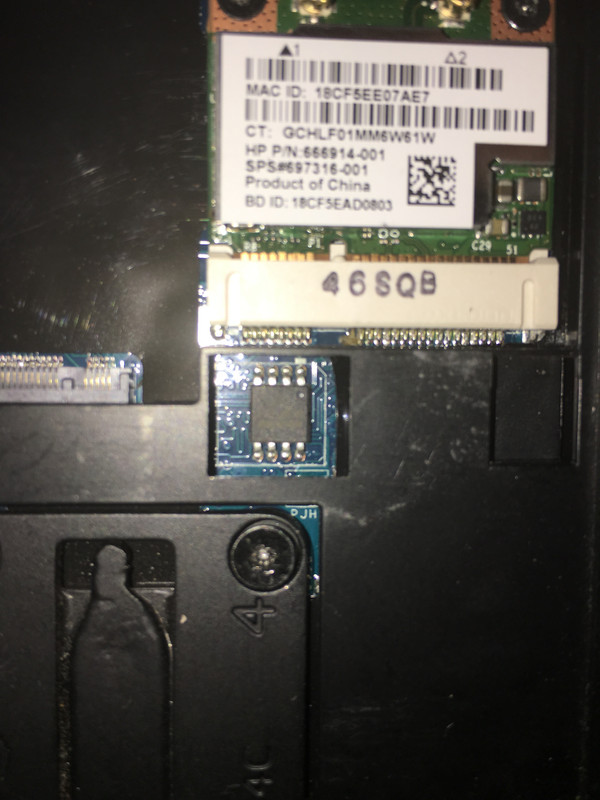
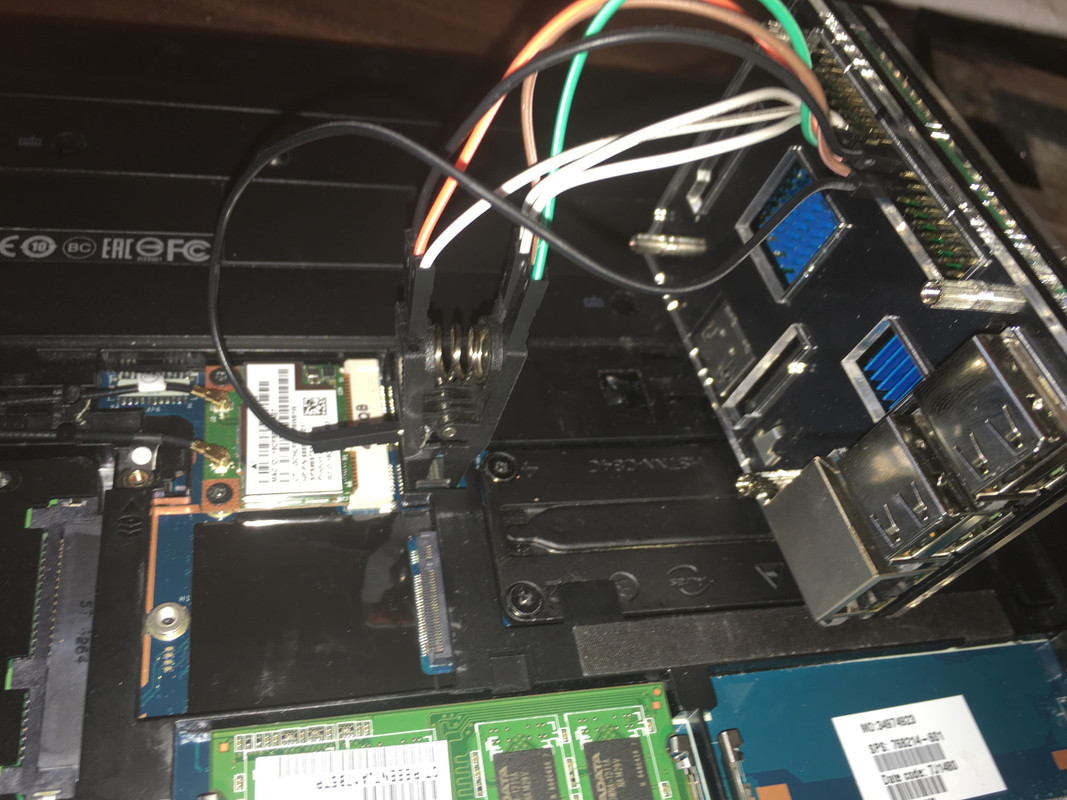
- Take off the back plate to your HP laptop and look for the 8-pin chip that you are going to clip in to. If you don't know what you're looking for then take a look at the pictures below for an example. Once you've found the chip write down the model number displayed on the top of the chip. With your model number in hand, do a Google search to find your EXACT chip's datasheet.
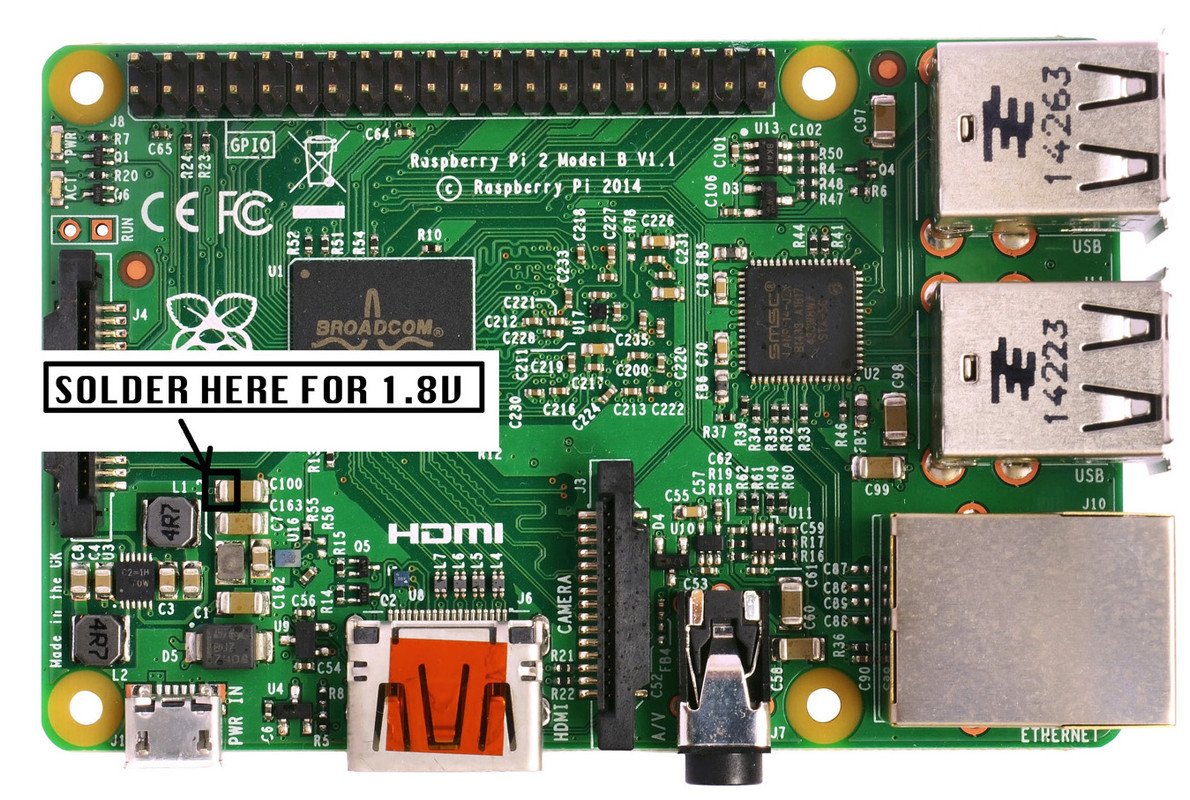
- Skim through the datasheet for the specific voltage setting on VCC (Pin 8) of the chip. Newer HP models have the voltage set as 1.8v-2.0v. If your model requires 1.8-2.0v then you absolutely will not be able to proceed until you are able to supply EXACTLY the required voltage. (If your HP requires ~3.3v-4.0v then continue to Step 3) Conveniently enough the Raspberry Pi has a spot that supplies 1.8v. Grab a soldering iron and some solder (and most likely a magnifying glass!) and solder a wire from to the spot on the Raspberry Pi that you can connect to your SOIC8 clip. Depending on which model of Raspberry Pi you have the spot will differ, so take a look at the pictures below to see where you'll need to make the solder point...
FOR ORIGINAL RASPBERRY PI
FOR RASPBERRY PI 2 MODEL B
- Connect your SOIC8 clip to the BIOS chip on the HP. Most HP's have them conveniently accessible by simply removing the back plate. See below screenshots for examples...
- Pull a copy of the chip onto your Raspberry Pi with Flashrom. An example command will look like this...
flashrom -r /path/for/your/bios.bin -VVV -p linux_spi:dev=/dev/spidev0.0
- Once you have your original bios.bin save a copy as a backup just in case something goes wrong you can always revert back to normal.
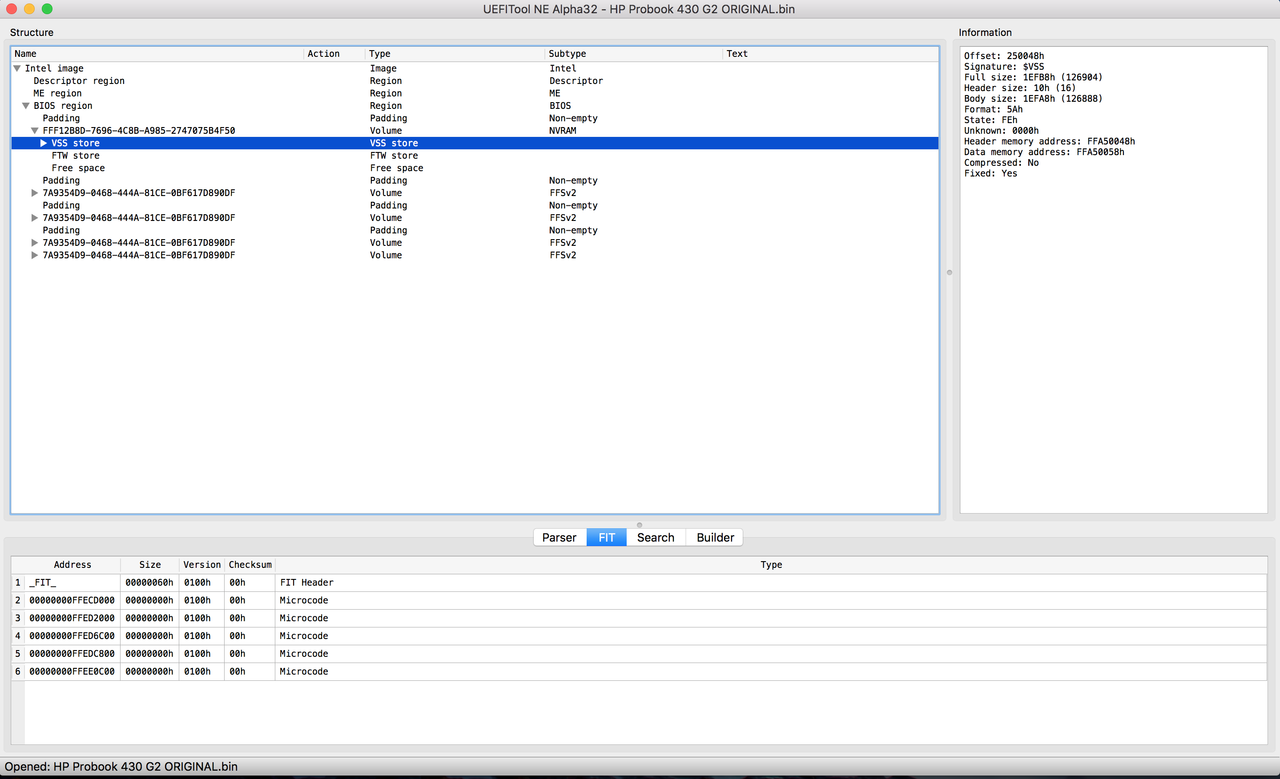
- Using your preferred OS open up a copy of your bios.bin with UEFITool. Navigate through the tree on the left-hand side of the screen until you find VSS_Store. It should be right around the same place as the picture below...
- Right click on VSS Store and extract "as-is" to your desktop. Name it something like Dirty_VSS_Store.vss so as not to confuse it with the Clean_VSS_Store.vss I have provided.
- If you are performing this on a HP Probook 430 G2 then you may use the provided Clean_VSS_Store.vss. If you are unlocking ANY other model of HP then you need to find a clean copy of your specific model's bios.bin and repeat steps 4 and 5. Again, you may contact me if you would like me to find you a copy to use for $10, just send me an Email or PM me and I'll get you hooked up. Before continuing you need to have BOTH a Dirty_VSS_Store.vss and Clean_VSS_Store.vss for your EXACT model.
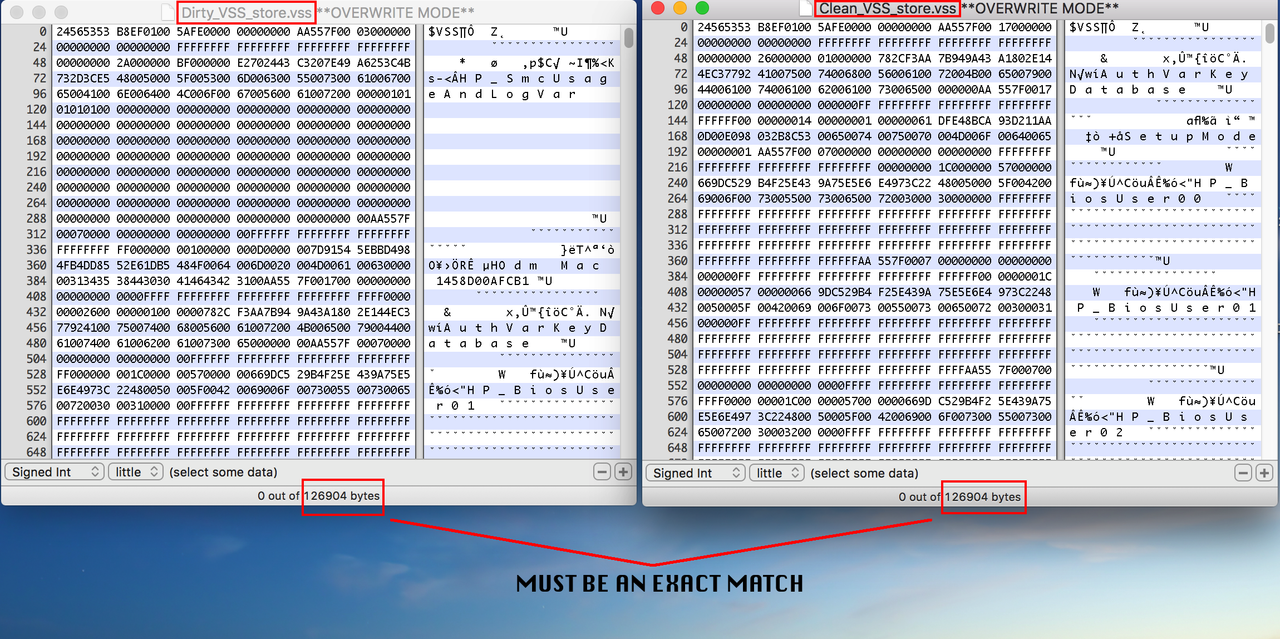
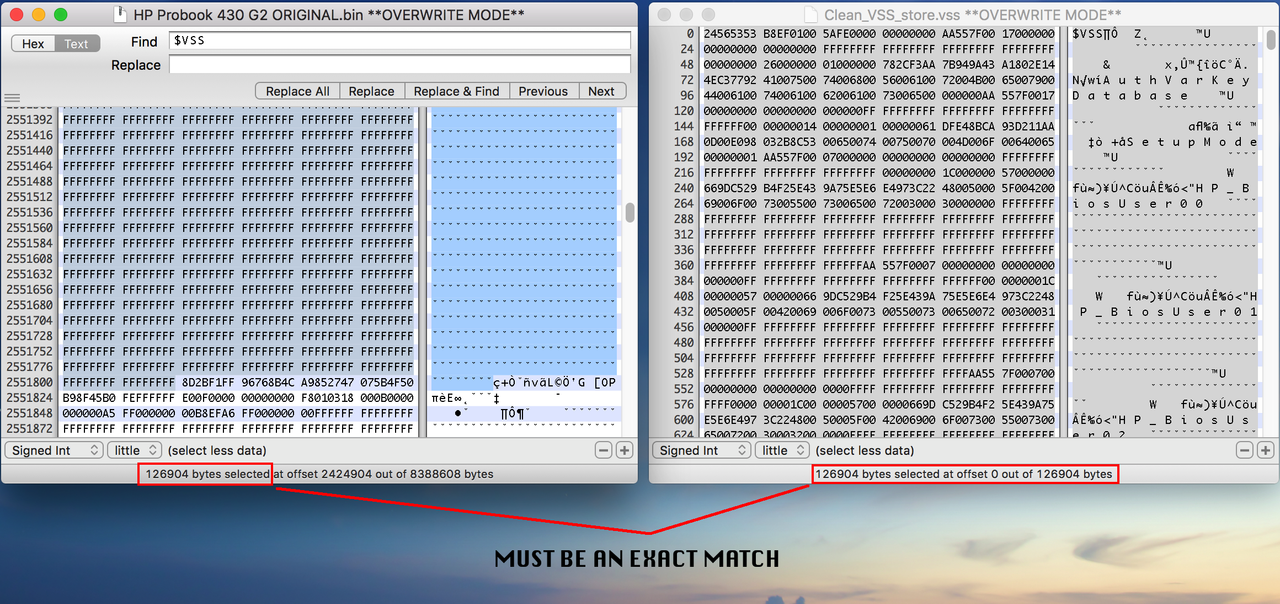
- Using either HxD (Windows), or iHEX (OS X), open both Dirty and Clean copies side by side. The objective here is to ensure both files are the same size down to the very last byte. If not then something has gone wrong somewhere and you'll need to either check if your initial read from the chip or the clean copy hasn't been corrupted somewhere along the line. See the example pictures below...
- Once you've confirmed a matching size close out of both and open your original bios.bin (that you copied using your Raspberry Pi) using the Hex Editor. Very similar to how we do Apple EFI, search for $VSS. Now open another window with your Hex Editor and open your Clean_VSS_Store.vss. Notice anything about the first few bytes of your VSS_Store??
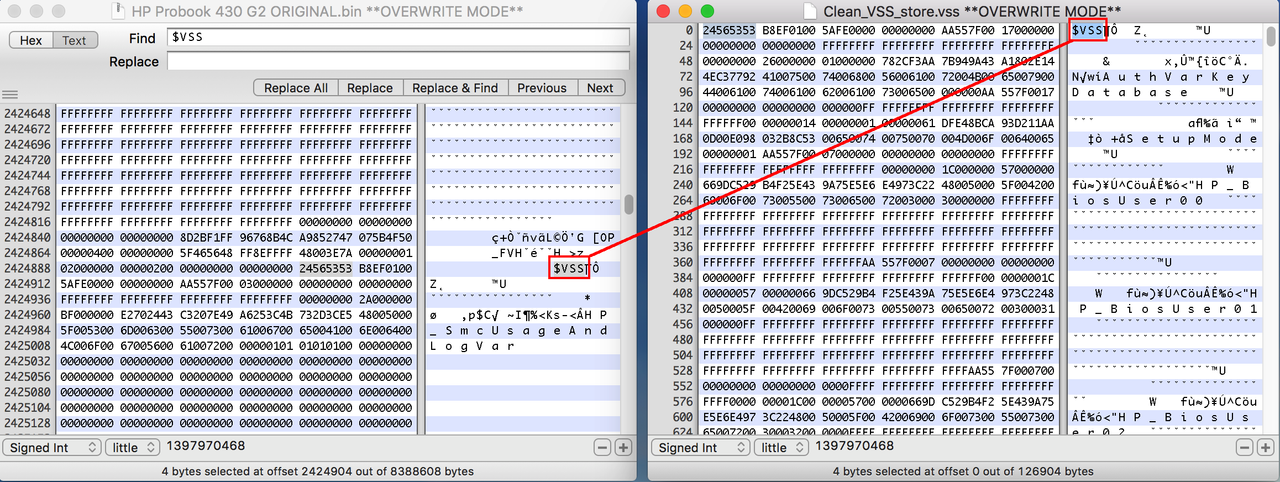
- Now highlight the entire contents of your Clean_VSS_Store.vss and right-click > copy. Now highlight the matching section within your bios.bin, starting at the "$" in "$VSS" and ending at the byte to match the exact size of your Cleam_VSS_Store.vss. See the below picture for an example.
- Replace the contents of the highlighted section within your locked bios.bin with the entire contents of your Clean_VSS_Store.vss. Save the modified file and name it something like test-bios.bin.
- Now all you have to do is use your Raspberry Pi to erase the chip on your locked HP...
flashrom -E -VVV -p linux_spi:dev=/dev/spidev0.0
Write your test-bios.bin onto the chip...
flashrom -w /path/of/your/test-bios.bin -VVV -p linux_spi:dev=/dev/spidev0.0
Verify the image has been written correctly...
flashrom -v /path/of/your/test-bios.bin -VVV -p linux_spi:dev=/dev/spidev0.0
And reboot your HP!
- Upon first boot hit F10 to enter the BIOS area and you'll be asked if you would like to access the BIOS as a GUEST. Say "yes" and on the first screen you'll see the option to set the new BIOS Admin Password :)